
Products
Once your products are in Etals, it can enrich every one of them. You get meta titles and meta descriptions that read well in search results, product descriptions that answer what shoppers want to know, and complete product data such as activity, materials and features.
This guide follows Nordvik Outdoor as it chooses which fields Etals writes and what its agents see, produces content by hand in a grid, and then lets an automation do the same for every new product.
Fields and master data
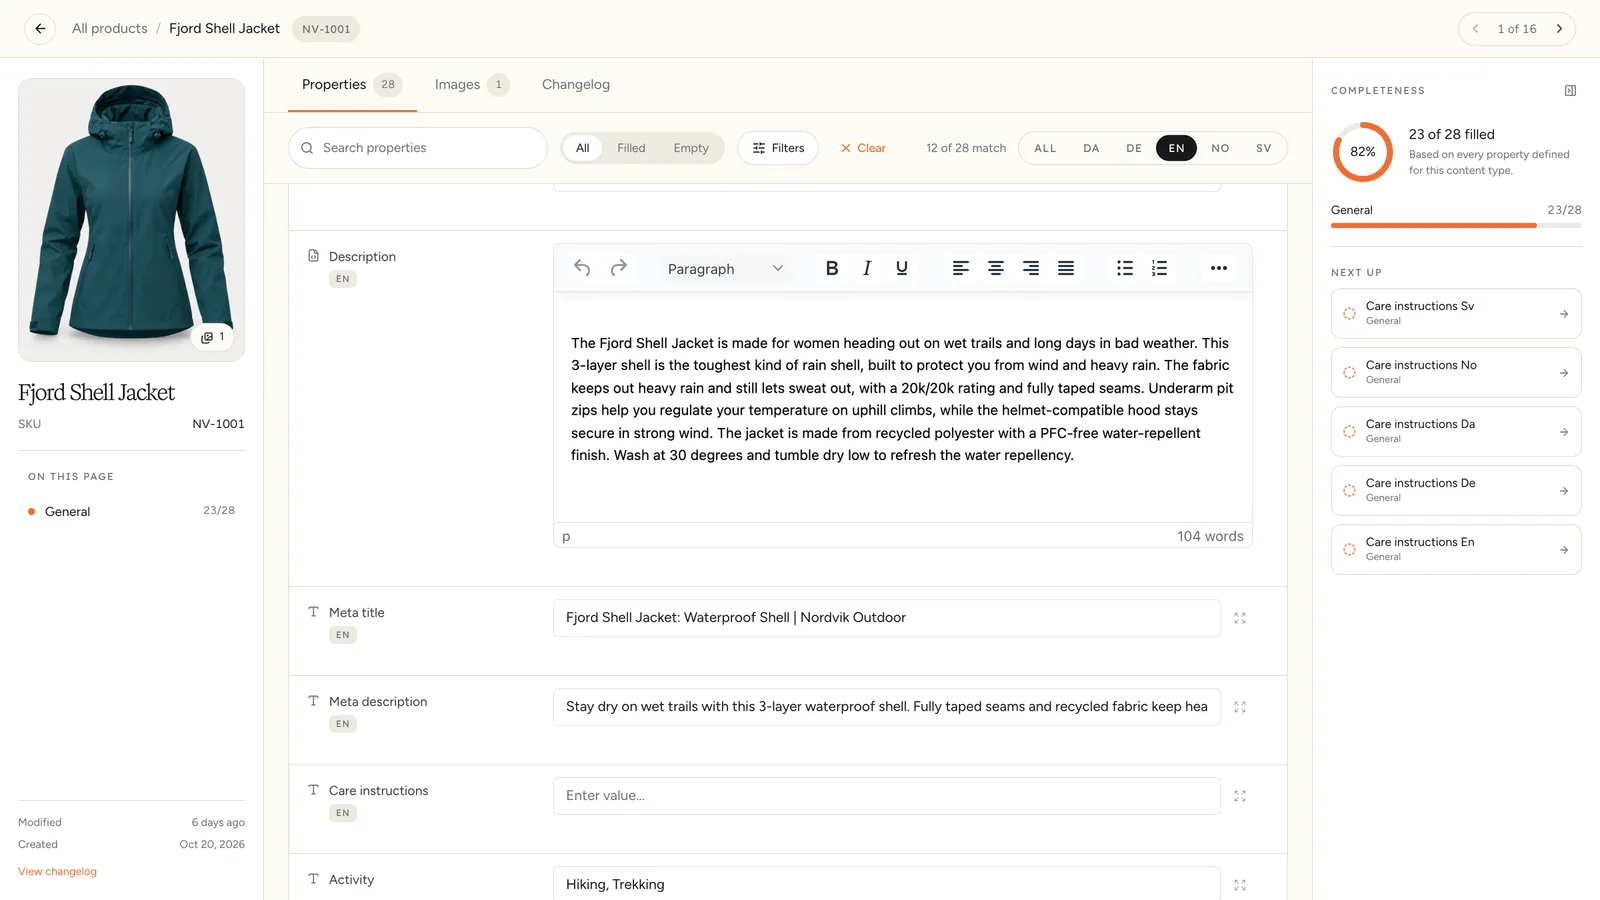
Every product has a set of fields. Some are texts, like the meta title, the meta description and the product description. Most products also have master data, like the category they belong to, their material and their technical specifications. Etals can enrich all of them.
To see the fields of a product, open My Data > Products and click the product. Pick a language at the top, such as EN, to see one value per field.
Step by step
Choose what Etals generates
The first step is to choose which fields Etals should produce.
Go to Setup > Onboarding and open the Products chapter. Click Set up, or Edit if your products are already set up. The window asks “Choose what Etals generates and what agents see”.
Switch on Etals can generate for every field Etals should write: the texts, and the master data too. Leave it off for data your own system owns. Nordvik left it off for Price SEK and Supplier Notes.
If a field is missing, add it first in My Data > Products > Properties & prompts with New property. Nordvik added Activity and Features this way. See Properties.
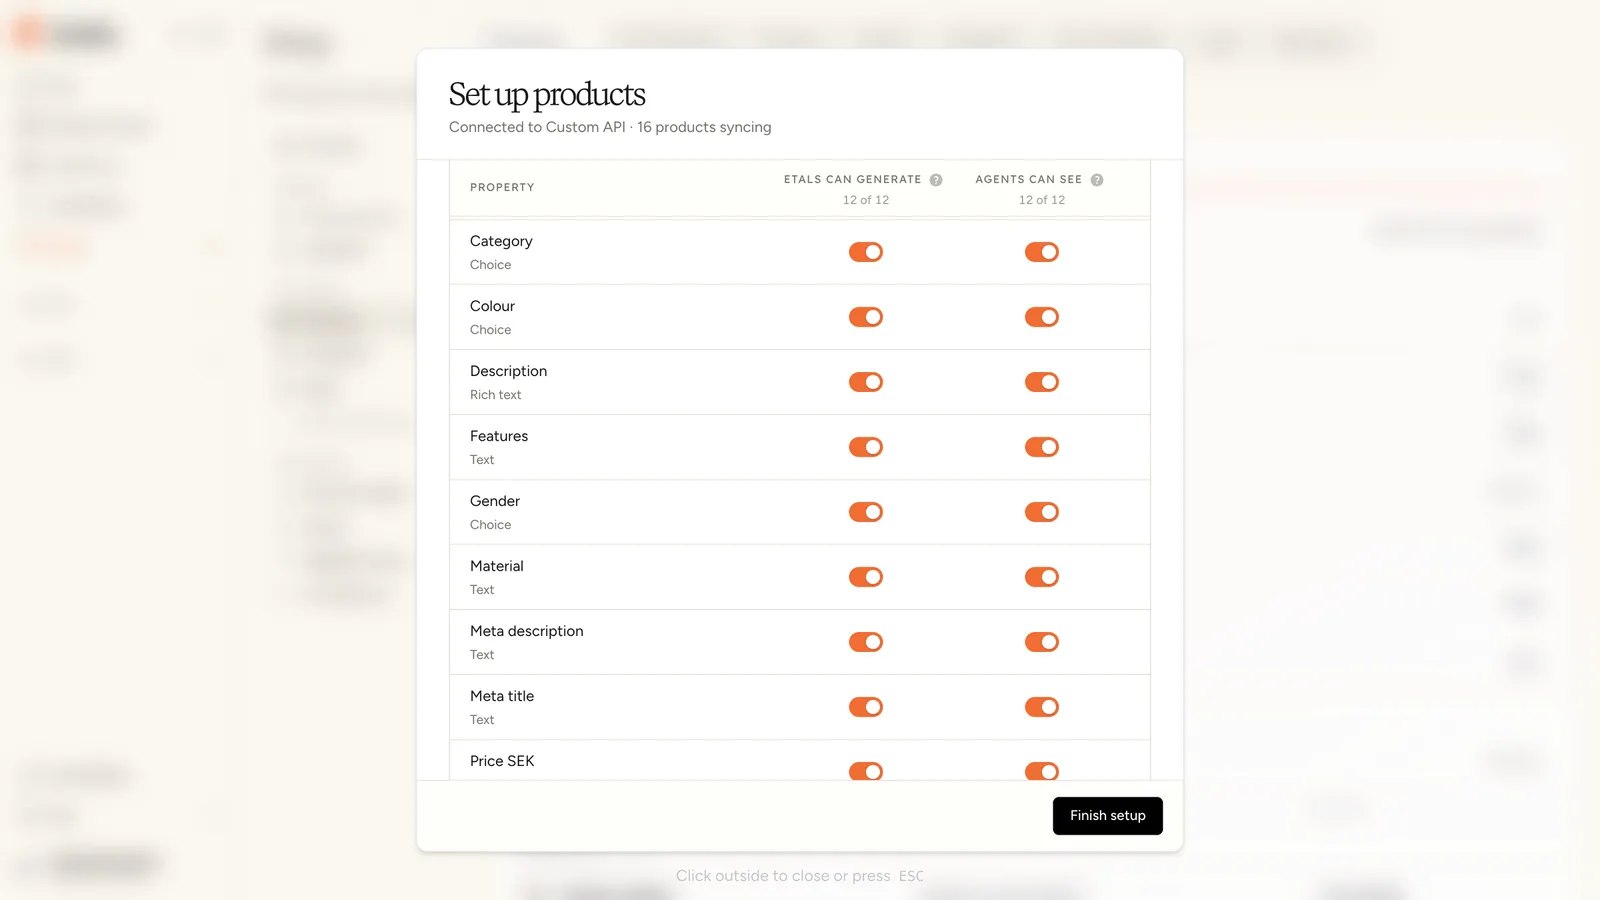
Choice fields such as Category and Colour are filled by picking from your own list of options.
Choose what agents see
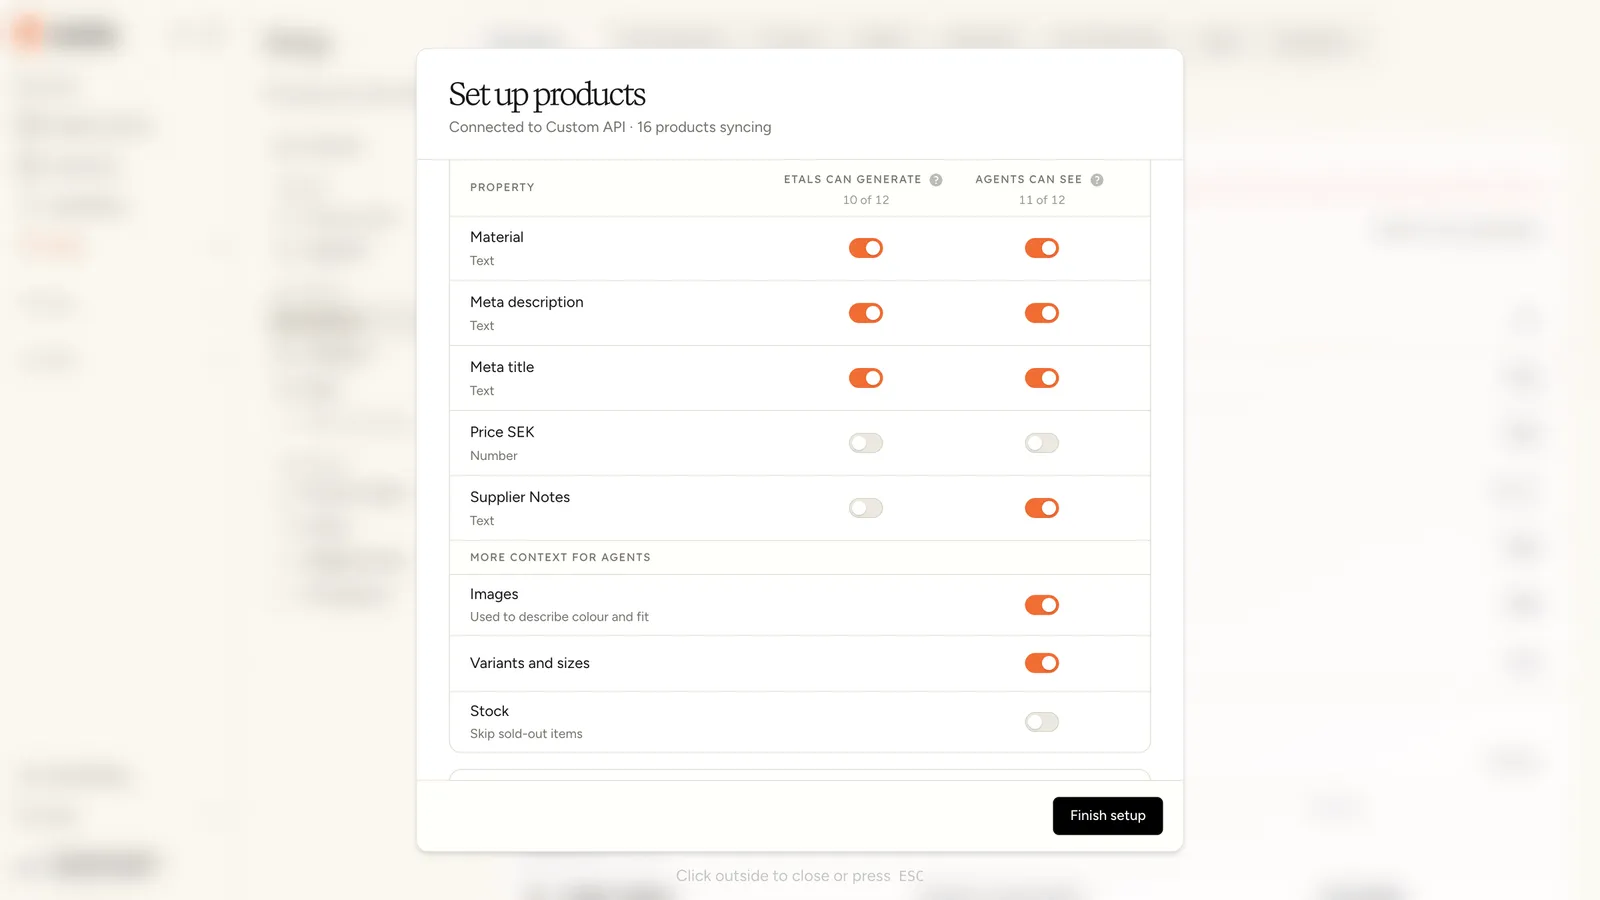
Then choose what the agents should see while they write. In the same window, the Agents can see switches decide what an agent reads about a product. The product’s name is always included.
- Under More context for agents, switch on Images (“Used to describe colour and fit”). The product image helps an agent describe colour and fit.
- Switch on every field that helps, like Material and Supplier Notes.
- Switch off anything that could confuse the agent. Nordvik switched off Price SEK, so the descriptions stay about the product and not its price.
Click Finish setup. You can change both switches any time in My Data > Products > Properties & prompts. See What agents see.
Train a field
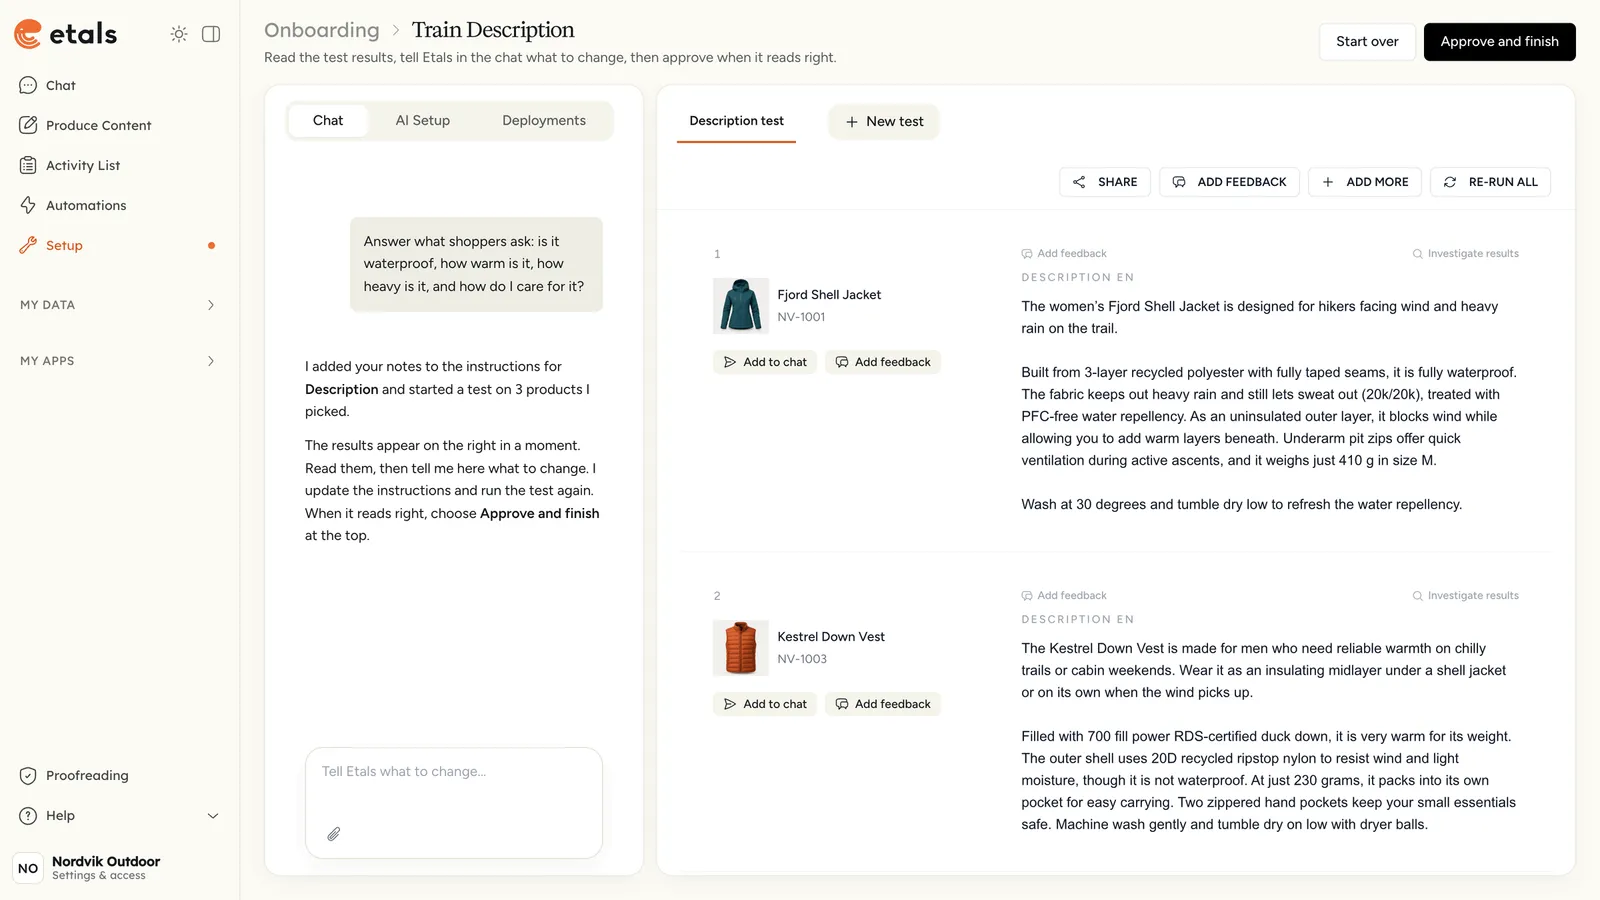
You can also train a field once, so it writes the way you like. After setup, the Products chapter has a training step for each field, such as Train Description. Click Train.
- Under What is important, say what matters in your own words, or click one of the Hints from Etals. Pick the language to test in under Test in. Nordvik wrote: “Answer what shoppers ask: is it waterproof, how warm is it, how heavy is it, and how do I care for it?”
- Click Continue. Keep Let Etals pick (“Three varied products out of your 16”) or choose the products yourself, then click Start training.
- Read the results on the right. If something is off, tell Etals in the chat what to change and it runs the test again.
- When it reads right, click Approve and finish. The step now says Trained.
Do the same for the other fields you care most about. What you teach is saved as that field’s instructions, and every agent that writes the field follows them. See My data.
Training needs access to Test & Optimize, and approving needs deploy rights there. If the button is greyed out, ask an admin.
Produce by hand in a grid
Now you can produce content, by hand or with an automation. To do it by hand:
- Open Produce Content and click New grid.
- Choose Products, then pick the products you want to work on. Tick them in the list (search by name or product code to find them faster) and click Add to grid. Nordvik picked three new arrivals: Arctic Trail Gloves, Polar Night Mittens and Coastline Rain Jacket.
- Add the fields Etals should write, and choose the languages for each one. Search for Description, click it and choose Produce. Tick the languages, here EN and DE, and click Add 2 localizations. Do the same for Meta title and Meta description. They vary by web shop, so EN there means the UK shop and DE the German one.
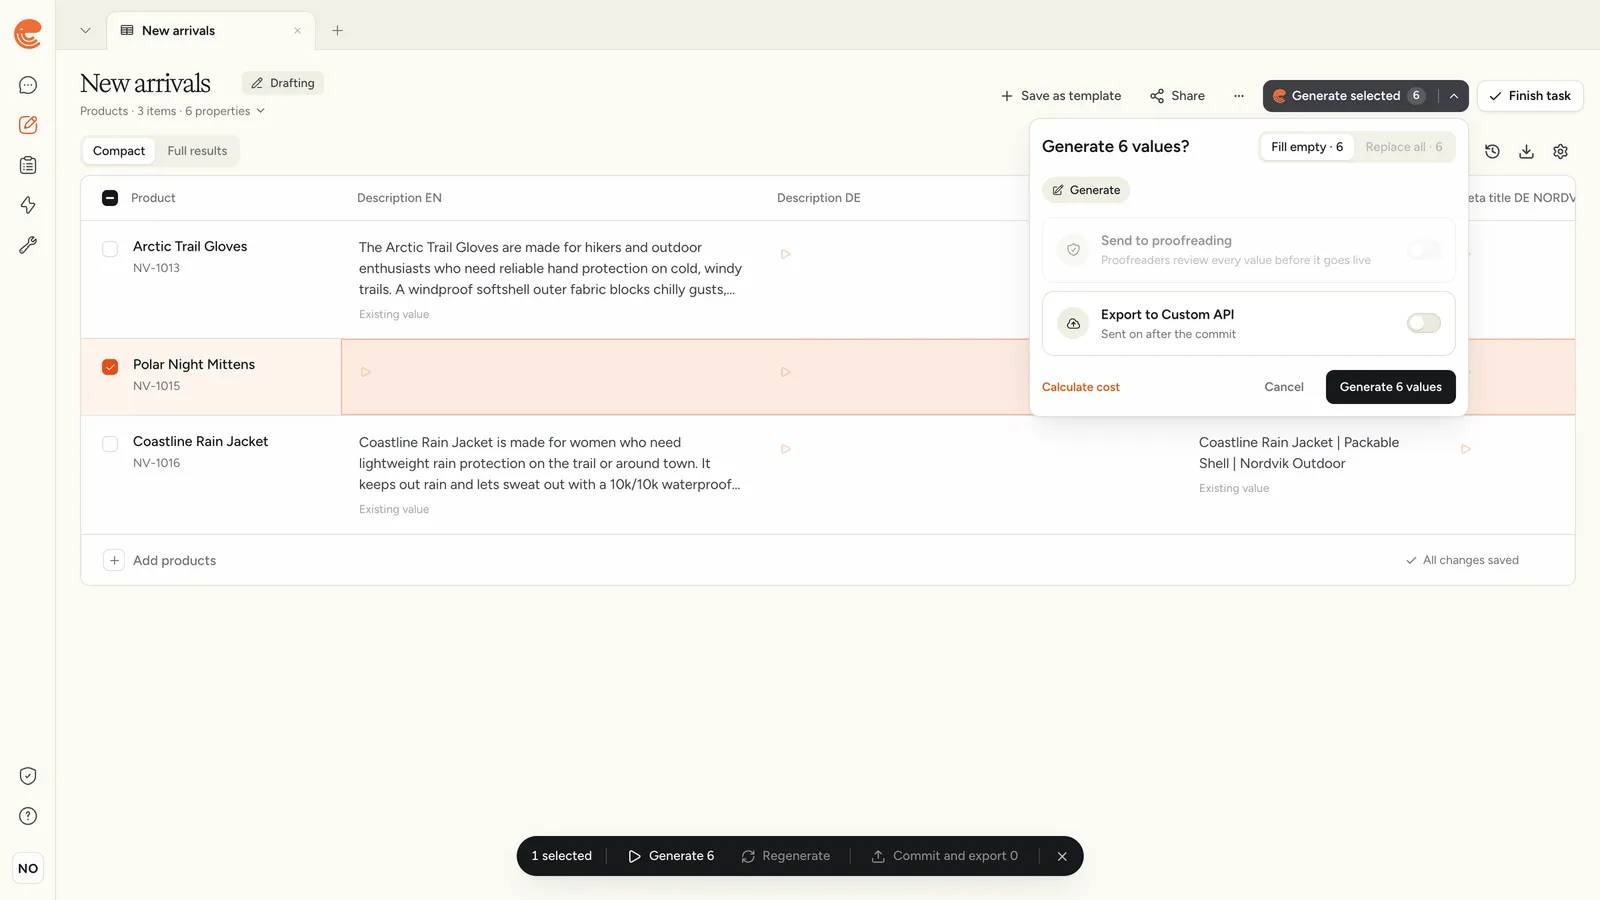
- Try one product first. Tick its row, click Generate selected and then Generate 6 values (the number depends on your grid). Etals writes that row and saves it to the product straight away. Nordvik tried Polar Night Mittens, which had no texts yet. Read the result.
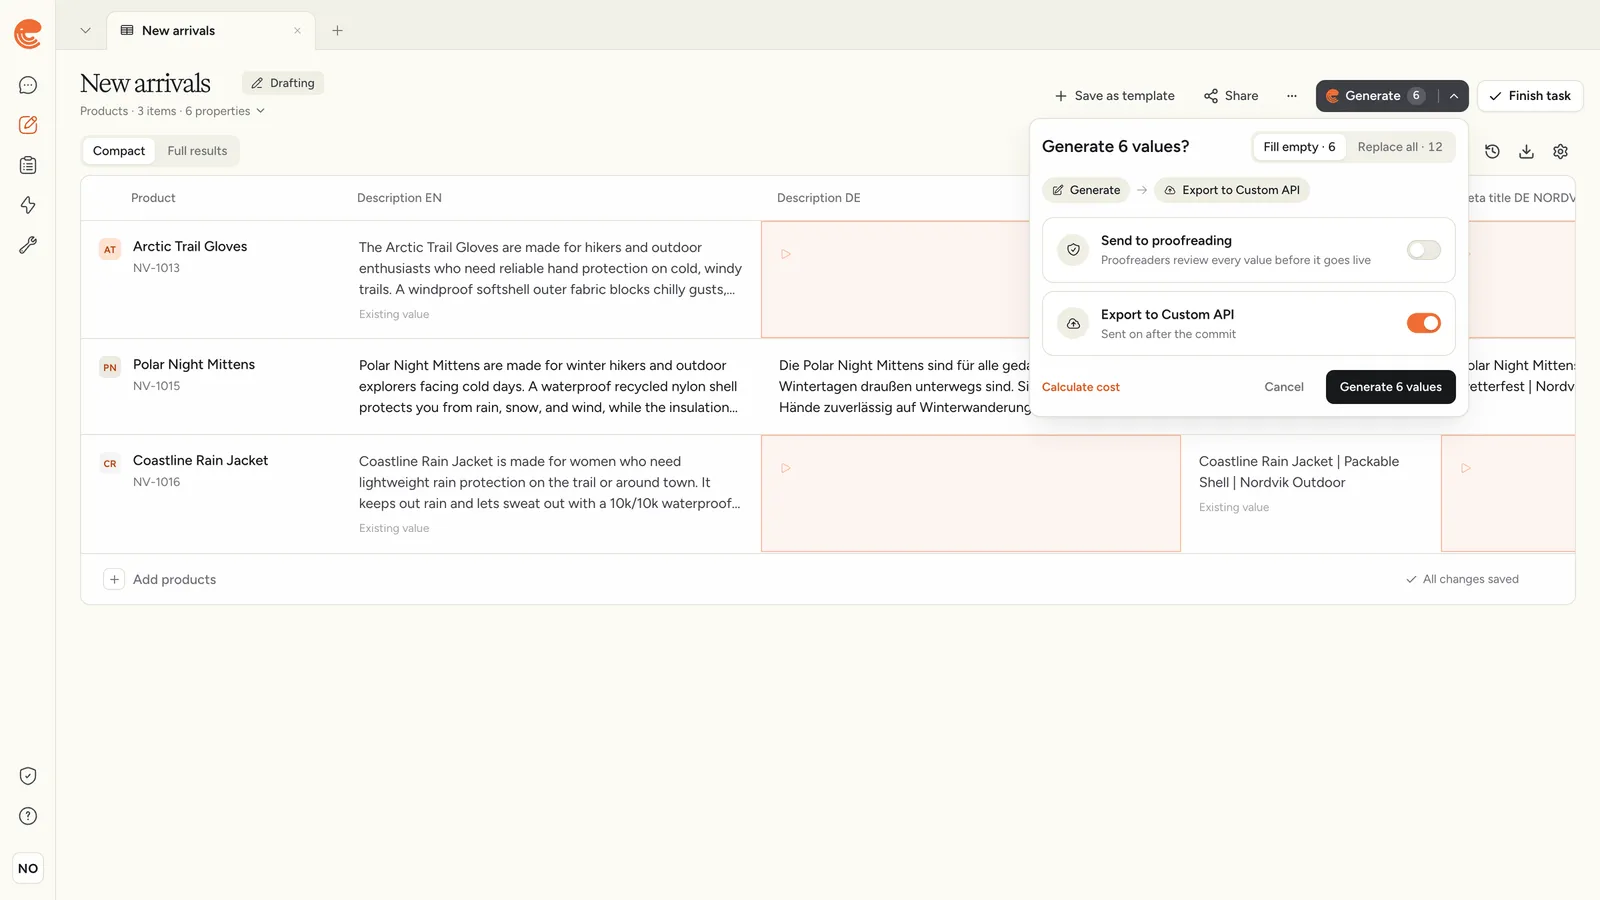
- When you like what you see, click Generate for the rest. Hover the button first to see which cells will be written. Fill empty writes only the cells that have no value yet. Replace all rewrites existing values too.
- If your shop is connected, turn on Export to followed by its name (“Sent on after the commit”) to send the results straight to your shop. Turn on Send to proofreading if someone should check the texts first. Click Generate 6 values.
Every value is saved to your products, and the task shows Finished. Click Full results to read the texts in full.
Only fields set to Exportable are sent to your shop. New fields start as Internal only, which suits master data you keep in Etals. See Export.
Save it as a template
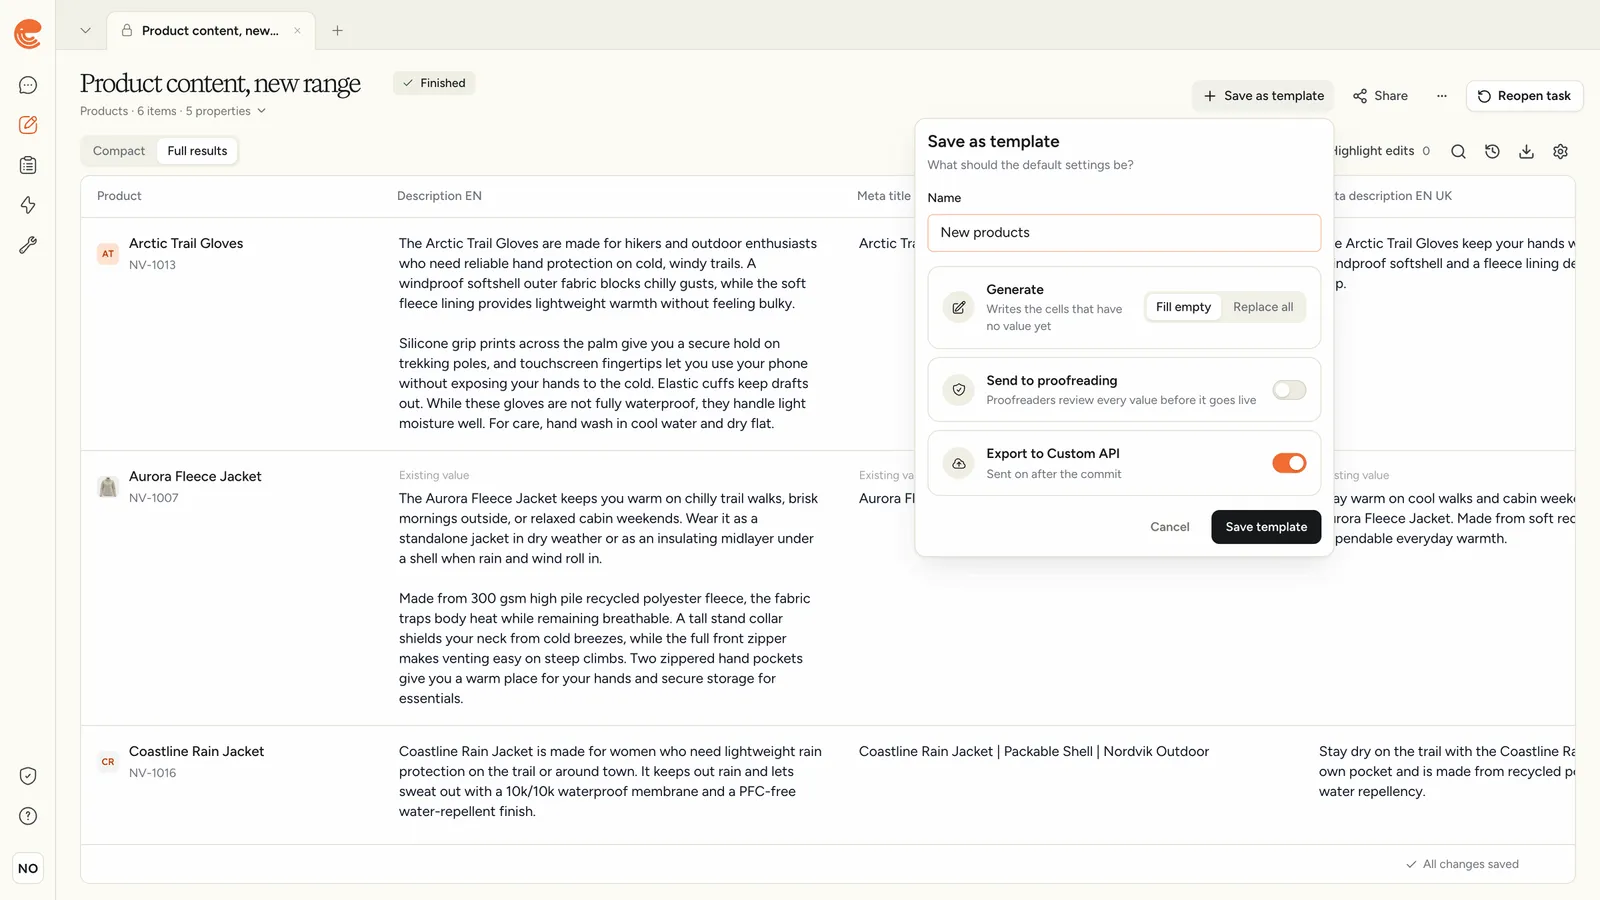
You’ll make the same choices again for the next batch of products, so save them as a template and next time it’s one click. Click Save as template at the top of the grid. Give it a Name, choose Fill empty or Replace all, decide on Send to proofreading and Export to, and click Save template.
Next time, open Produce Content and click the template under Templates. A new grid opens with your fields, languages and settings in place. Pick the products and click Generate.
Or let an automation do it
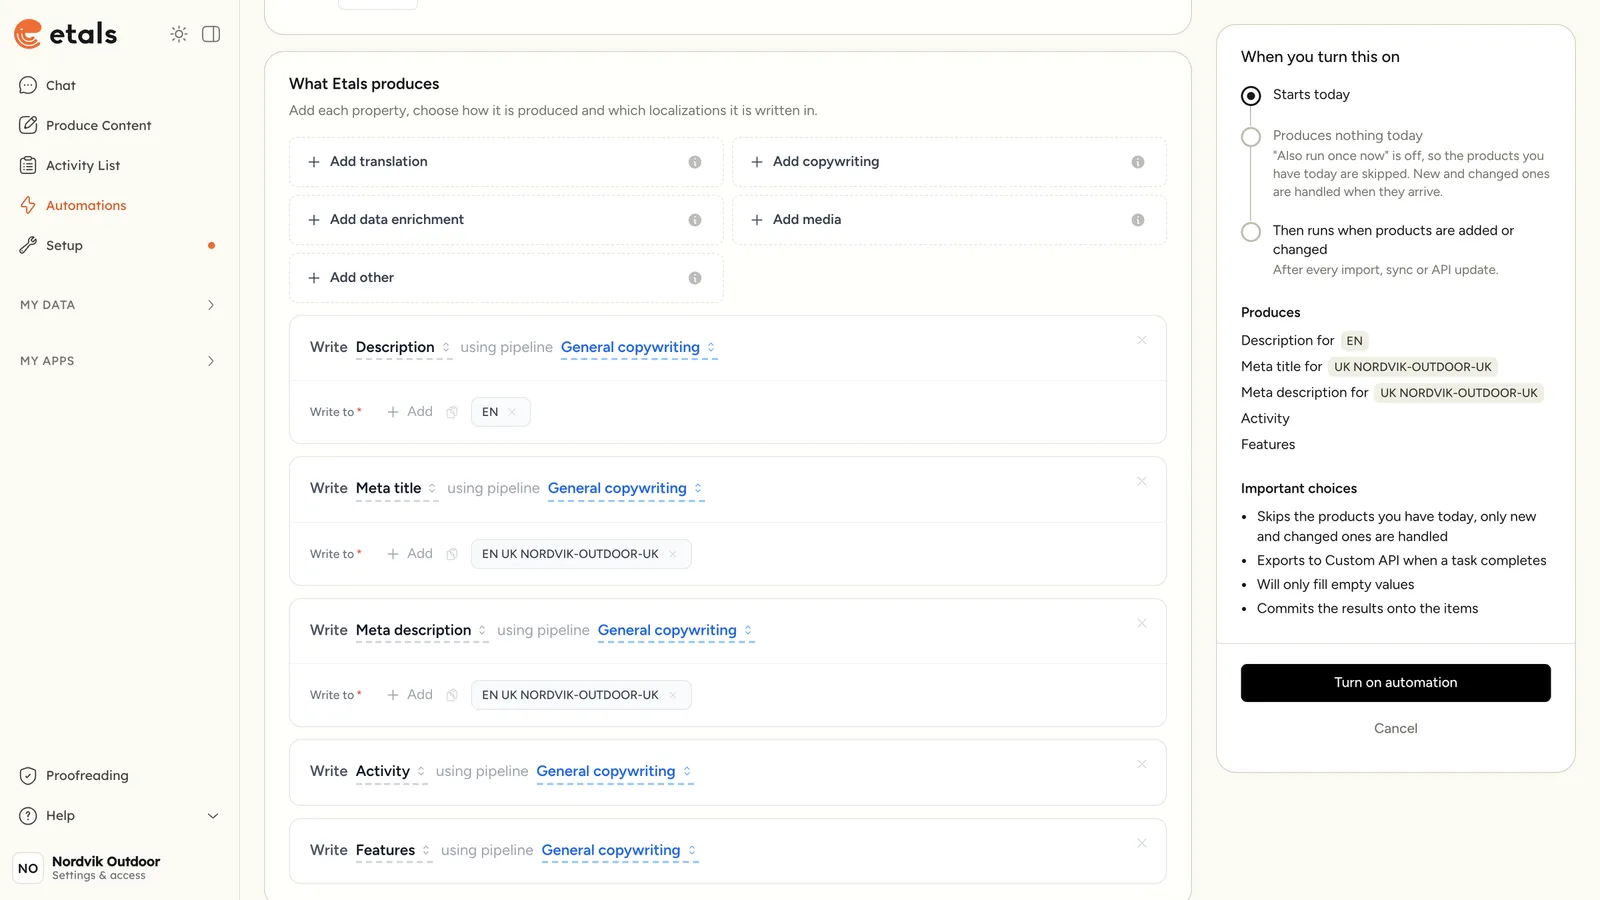
An automation gives new products the same treatment without anyone opening a grid. Open Automations and click New automation, or click Turn on next to Turn on an automation in the Products chapter of Setup > Onboarding.
- Under Works on, pick Products. Under Start from a template, pick your template. It fills in what Etals produces and the settings.
- Check What Etals produces: every field and the languages or web shops it’s written for.
- Under When it runs, keep When products are added or changed. It runs after every import, sync or API update and only handles those products. Tick Also run once now if your current products should be done too.
- Under After it is written, choose Save as drafts to review the results in Tasks first, or Publish to your connected platform to send them straight on.
- Click Turn on automation.
What you get
Search listings people want to click
A product’s meta title and meta description are what shoppers see in search results. A typical unoptimized listing is too long, gets cut off and repeats keywords:
The new title fits, says what the product is and names the shop. The description gives a reason to click.
Descriptions that answer questions
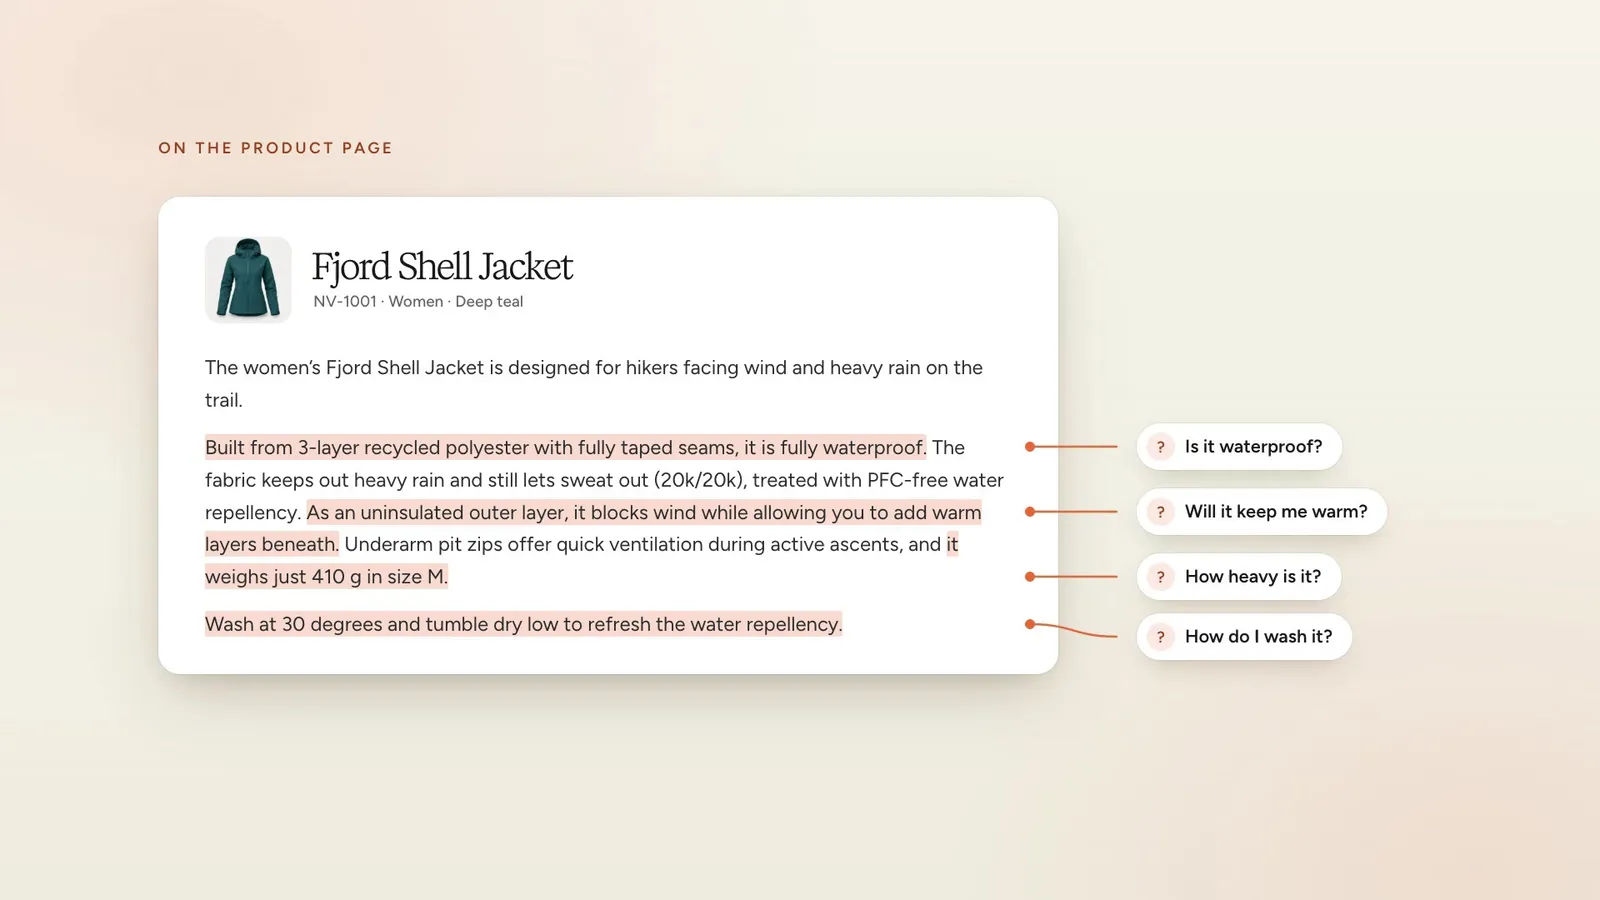
Nordvik trained its descriptions to answer what shoppers ask. The test description for the Fjord Shell Jacket answers four common questions before anyone has to ask them:
The facts come from Nordvik’s own data and rules: the product’s material and supplier notes, and its Materials and care skill. See Skills.
The same quality across the whole range
Because the instructions, the template and the automation are shared, every product gets the same care, however many you have. Complete, correct product data and clear texts make your products easier to find in search, and help the people who find them decide to buy.